Setting up PXE network booting server microsoft.mp4
https://www.youtube.com/watch?v=0R0f4olz-Pw
network booting Tools
- iPXE - a scriptable network boot loader and firmware
- PXELINUX - a flexible network boot loader
- wimboot - boot Windows .wim files directly using iPXE
- rom-o-matic.dev - a simple web interface for building an iPXE binary
- Tftpd32 - a free DHCP and TFTP server for Windows
- LIO - an open source iSCSI target for Linux
- Puppet Labs Razor - a provisioning tool used to manage bare-metal deployments for Puppet
- Microsoft iSCSI Software Target - a Windows Server 2008 component that provides iSCSI services to your network
- System Center Configuration Manager (SCCM) - a Microsoft product used to deploy and manage large groups of Windows computers
- Foreman - a complete lifecycle management tool for physical and virtual servers
Walkthrough - Install Win XP by booting through PXE
The B2175 doesn't boot to USB, it doesn't have a floppy drive and it doesn't have a CD drive.
The only way to install anything on it is through PXE.
Solution
- Download my custom zip file package. It contains everything required to install Win XP through PXE except for the Win XP installation files ;-)
- Unzip the file to C:\ drive. After unzipping you will have a folder called 'root' and a file called smartdrv.exe on the c drive.
- Copy the i386 folder from your windows xp cd to a folder that is shared on your local network. In my case I copied the i386 folder to \\xpcomputer\video .
- Copy the file smartdrv.exe from c:\ to your share folder i.e. \\xpcomputer\video
- In the root folder there will be a file called 'Tftpd32-3.33-setup.exe'. Run the file to install a TFTP server onto you computer.
- After installing the TFTP server. Start the TFTP server.
- Change current directory to 'c:\root' in the TFTP server program
- Under DHCP Server tab set the following (assuming your router's ip address is 192.168.0.1):
ip pool starting address to 192.168.0.40
Size of pool 10
Boot file pxelinux.0
WINS/DNS Server 192.168.0.1
Default router 192.168.0.1
Mask 255.255.255.0 - Click save and then choose the 'settings' button and make sure that 'PXE compatibility' is checked.
- Now boot the destination machine into PXE. After PXE boots up you should see the following screen. Choose 'network boot' and press enter.

- On the next screen choose option number 2 - boot with emm386 (max memory). (I tried option 1 but this caused the windows xp setup to fail with the message 'not enough memory' on my system).

- After some more loading text, you will get to the following screen. You must choose 'Config' before the 10 second countdown.

- On the next screen choose 'Global' from the list of choices. This will let you alter host settings that will be required later on.

- On the next screen choose 'Lmhosts'.

- Click 'Ok' on the warning message you receive as it is not applicable to our situation.

- In the next screen you can edit the systems host file. This is where you can define the ip address and the name of the server where the windows installation files are held. This is important as without these settings the system will not be able to see the server. Please note that in this example there is a [tab] between 192.168.0.225 and xpcomputer.

- Save the file by typing ALT+X and click 'back' and then 'exit' on the next screens.


- Now we need to go back into the setup to allow the system to finish its network settings. This is done by typing in 'msnet' at the prompt as below and then clicking 'Ok' on the screen after


- You will now see 4 prompts which should disappear one by one with default settings. The last of the 4 prompts is titled 'Network Identification'. You will need to click 'Ok' to accept the default settings on this prompt. After this you will be prompted for a password. Just press [enter] for a blank password.

- Now type 'msnet' at the prompt and choose 'map' to go into the network drive mapping utility.

- In the 'Map drive' prompt type in a drive letter and type in the network path of where the windows i386 folder is located. Click 'Ok'

- Click on exit to go back to the command prompt. Make sure it says 'The command completed successfully' to confirm that the network drive was mapped correctly.

- Now run smartdrv.exe from the mapped drive by typing in z:\smartdrv.exe at the command prompt.

- Next start the windows xp installation process by typing in z:\i386\winnt.exe .

- On the first screen of the windows xp installer it will ask for the location of the installation files. Make sure that this shows z:\i386

- Now you can continue with the windows xp as normal.
I have run this setup on a home network with normal settings. I wouldn't set this up on a corporate network unless you know what you are doing as the TFTP server may interfere with DHCP settings or other settings.
I referenced the following page in order to create this walk through.
http://r00tsecurity.org/forums/index.php?showtopic=9338
https://www.lazybrowndog.net/freedos/virtualbox/?page_id=749
When you got the settings they will be written in the mtcp.cfg file.
Assuming the file is stored at C:\FDOS\mtcp.cfg
You can view the contents of the file with the command: type c:\fdos\mtcp.cfg
Error 6118: The list of servers for this workgroup is not currently available.Please check if your C:\NET\SYSTEM.INI is configured to use the full director:preferredredir=full autostart=full
Make sure both settings say „full“ and not „basic“.
Now you should see the machines in your workgroup, but it still may not be possible to access them with “net use“.Error 5: Access has been denied.
Windows 10: Install Group Policy Management Console
The ability to manage Group Policy on a domain via the Group Policy Management Console is not available on Microsoft Windows 10 or Windows 8 by default. You will need to install Remote Server Administration Tools first, then activate it. Here’s how it’s done.
Note: You can install Remote Server Administration Tools for Windows 10 only on the full release of Windows Professional or Windows Enterprise. Otherwise you will receive a “This update does not qualify for your computer.” message when you try to install it.
Windows 10 Version 1809 and Higher
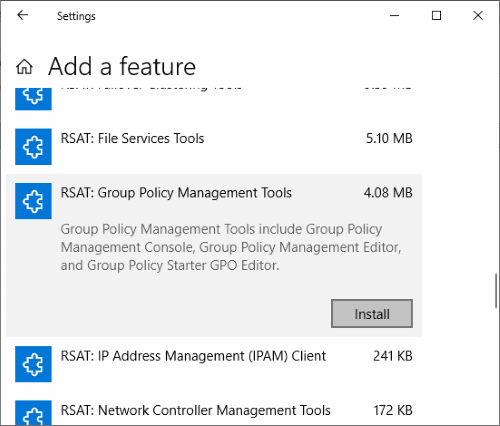
- Right-click the Start button and choose “Settings” > “Apps” > “Manage optional features” > “Add feature“.
- Select “RSAT: Group Policy Management Tools“.
- Select “Install“, then wait while Windows installs the feature. It should eventually appear as an option under “Start” > “Windows Administrative Tools“.
Windows 8 and Windows 10 Version 1803 or Lower
- Download and install one of the following depending on your version of Windows:
- Right-click the Start button and choose “Control Panel“. (Note: In some configurations, you may be able to skip to step 8.)
- Select “Programs“.
- From the “Programs and Features” section, select “Turn Windows features on or off“.
- Scroll down and expand the “Remote Server Administration Tools” section.
- Expand “Feature Administration Tools“.
- Ensure that “Group Policy Management Tools” is checked, then select “OK“.
- You should now have an option for “Administrative Tools” on the Start menu. From there, select any of the Group Policy tools you need.
Open: Group Policy Editor.
Computer Configuration - Windows Settings - Security Settings - Local Policies - Security Options
And choose:
Network Security: Do not store LAN Manager hash value on next password change
Disable it
Open: Network Security: LAN Manager authentication level.
Send LM & NTLM - use NTLM v2 if negotiated.
reboot

